Steel structure staircase engineering production
- 04 Jan 2020
- steel structure
Steel components in steel structure mainly include steel columns, steel beams, and steel plates. All the steel columns are semi-finished products, and the blanking should be customized by the manufacturer; The steel beam is linear, and the blanking is performed by a straight flame cutting machine and a numerical control flat cutting machine.
1. General Processing technology
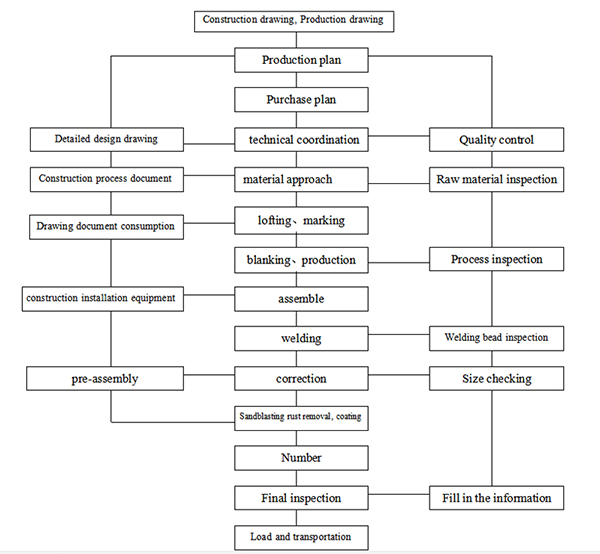
2. Lofting、marking、cutting
2.1 When lofting to produce the samples plates, sample rods and mark the material, the allowance for welding shrinkage, cutting seam allowance, and milling and planing allowances should be reserved according to the drawings and process requirements. Before marking the material, the dirt, rust and other dirt on the steel surface should be removed.
2.2 The allowable deviation of lofting and sample plates (sample rod) is as follows:
| Item | allowable deviation |
|---|---|
| Parallel line distance and segment size | ±1.0mm |
| Diagonal difference | ±1.0mm |
| width、length | ±1.0mm |
| hole distance | ±1.0mm |
| Processing sample plates angle | ±0.2° |
2.3 Allowable deviation after marking the material is as follows:
| Item | allowable deviation |
|---|---|
| Components shape size | ±1.0mm |
| Hole distance | ±1.0mm |
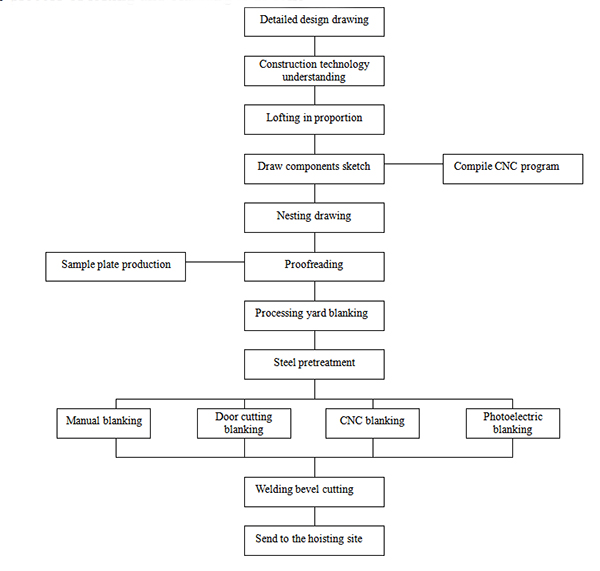
2.4 The process of lofting and blanking is as follows:
2.5 Before gas cutting, the rust and dirt on the surface of the steel cutting area should be cleaned away. After gas cutting, the dissolved slag and spatter should be removed. The straight blanking of steel plate is cut by a multi-head automatic cutting machine or semi-automatic cutting machine. While the arc blanking of steel plate is cut by CNC flat cutting machine. When the thickness of steel plates is over 12mm, the blanking should be carried on by an automatic gas cutting machine, and when thickness of the steel plates is less than 12mm, the blanking should be carried on by a shearing machine.
The allowable deviation of components after gas cutting is as follows:
| Item | allowable deviation |
|---|---|
| Width, length of components | ±3.0mm |
| Flatness of cutting surface | 0.05t, but no more than 2.0mm |
| Cut depth | 0.3mm |
| Notch depth | 1.0mm |
2.6 The blade distance of the shearing machine should be adjusted according to the thickness of the steel plate, and the section of the steel plate to be cut should be flat. The components after cutting should remove the sharp edges, burrs, etc. And yellow paint should be used as the logo. The allowable deviation of components after steel plate cutting is as follows:
| Item | allowable deviation |
|---|---|
| Width ,length of components | ±2.0mm |
| edge chipping | 1.0mm |
3. Bevel processing
3.1 The pipe bevel is cut by a six-dimensional CNC intersecting line cutting machine during the processing of the pipe mouth. The bevel of steel plate components is generally cut by gas, and it can also be cut by planing.
3.2 Larger bevels must be cut by automatically or semi-automatically oxygen and acetylene, and then polished with a grinder to remove the oxide layer.
3.3 The allowable deviation of bevel processing shall be strictly implemented as follows:
| Item | Allowable deviation |
|---|---|
| Bevel angel | ±4° |
| Dull edge | ±1.5 |
| Bevel groove | ±2.0 |
4. Steel structure stair components assembly
4.1 Assembly site
The assembly position on the site should be arranged vertically in the direction of the staircase structure height to facilitate the assembly of the tire frame in the lower section and the upper section , so that the overall pre-assembly sequence of the entire staircase is consistent.
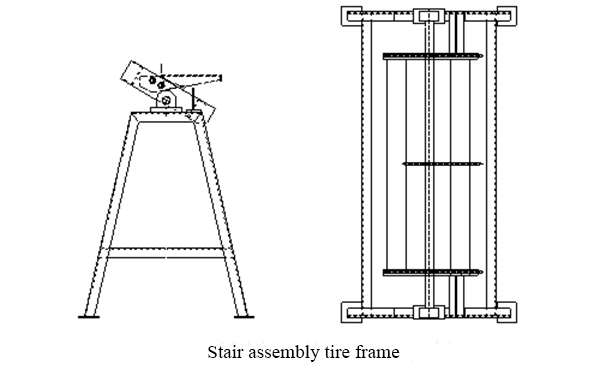
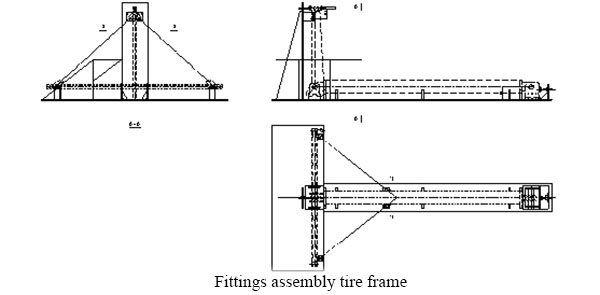
4.2 Tire frame assembly
Firstly level the site, and release large samples of horizontally steel frame respectively on the ground, and then use expansion bolts on the concrete floor at the joints of the steel frame to set the steel plate embedded parts, or you can also lay steel plate strips on the concrete floor and lay the section steel on the embedded parts. The surface height difference of each section steel should be controlled within 3mm and reinforced to ensure the rigidity and stability of the platform. The illustration of assembling the tire frame is as follows:
4.3 Assembly method
Before assembling, put out an accurate large sample on the tire frame, mark the position of the nodes in detail and accurately, and make a corresponding template tool with sufficient accuracy. The dimensions of the sample and the template tool should be assembled after inspection and confirmation. The assembly is in the sequence of components from the ground to the top. According to the required size on the drawings, strictly control the dimensional deviations within the specified range, especially the gap clearance, which plays a key role in ensuring the welding quality, welding shrinkage and welding deformation. Manual arc welding will be adopted in spot welding fixing during assembly. After the assembly is completed and inspection is passed, welding shall be performed in accordance with regulations.
4.4 Assembly requirements
Before assembly, the plate shall be inspected and qualified, and the rust, burrs, dirt, dust, etc. on the contact surface and 50mm along each side of the welding edge shall be removed. If there is splicing for plate, it should be carried out before assembly, and the assembly of components should be carried out after parts assembly, welding, correction or drilling of grooves.
If the temporary fixture is spot welded on the steel for assembly, the base metal should not be damaged when the fixture is removed, the remaining welding scars should be leveled, the base material should be ground within 3mm, and the MPI inspection should be performed.
5. Welding
5.1 Welding procedure qualification. Before the steel structure stair project starts, a welding procedure qualification test is performed according to the project requirements.
Prepare welding construction technology and welding work instructions based on welding process assessment. The welding work instruction should specify the specific conditions of the joint form, welding method, welding position, material grade and specification, heat input during welding and heat treatment after welding.
The welder shall review the quality of the joints of the weldment and the treatment of the grooves, gaps, blunt edges, etc. in the welding area. The rust, scale and other dirt that affect welding quality should be cleaned in welding area and both sides. When any non-compliance is found, welding shall be carried out after repairing the grid and qualified.
5.2 According to different joints forms, different welding sequences are performed. The overall welding sequence of the steel frame is mainly from the middle to the two sides, and the welding main stress should be released.
When welding, the welder shall abide by the welding procedures and welding technology, and shall not perform welding freely, and shall not initiate arcs on the base metal outside the weld bead. Do not use welding rods with detached coatings or rusted cores, damp-caking fluxes, and molten slag shells. Welding wire and nails should be cleaned of oil and rust before use.
5.3 The electrodes and fluxes should be baked according to the baking time and temperature specified in the product manual before use. The purity of the shielding gas shall meet the requirements of welding process qualification. After the electrode is baked at 350oC for 1.5 hours, it should be placed in the insulation bucket and taken as needed.
5.4 Spot welding shall be performed according to the following regulations:
Before welding, the groove size and root clearance must be checked according to the construction drawings and process documents. If the requirements are not met, spot welding cannot be performed.
The type of welding material used for spot welding should match the material of the weldment.
When making stairs, the size of the spot welding foot should not exceed 2/3 of the designed weld thickness, and should not be greater than 6mm, the length of the weld should not be less than 50mm, the gap between the welds should be 400-600mm, and the position of the spot welding should be arranged within the weld bead.
Spot welds must be free of defects such as cracks, slag inclusions, or welding knobs.
5.5 When cracks occur in the weld, the welder must not handle it without authorization, and the cause should be investigated and it can be dealt with only after repairing. If necessary, notify the welding engineer for processing. The number of repairs for the same part of the weld should not be more than two times. When it is more than two times, the repairs should be carried out after the owner's approval according to a specially formulated repair process.
5.6 For welds that require flaw detection, if there are impermissible defects, the flaw detection length should be increased at the extension of the two ends of the defect. The increased length should not be less than 10% of the weld length and not less than 200mm. In the case of other impermissible defects, 100% inspection of the weld shall be performed.
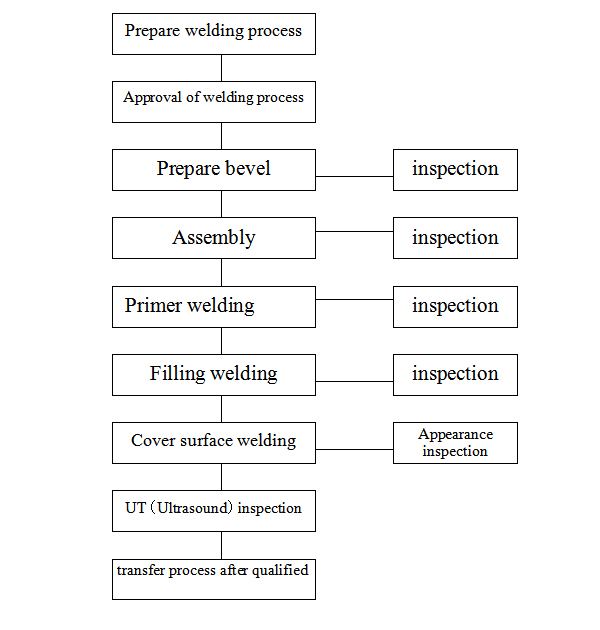
5.7 The welding process is as follows:
6. Derusting, painting, numbering
In the steel structure staircase project, a considerable numbers of the component may be small in size, and the size of the entire outer edge is large but the solid area is small after the component is manufactured. Therefore, the part after laying off , cutting and machining before assembly should remove the rust and paint a primer as a workshop paint, after the assembly is finished, painting it to the factory requirements.
6.1 Surface cleaning
In addition to the oxide scale and rust generated on the steel surface, there are also pollutants such as grease, dust or chemicals brought about during processing, transportation, or storage. These contaminants directly affect the adhesion, uniformity, density and gloss of the coating. Therefore, before removing the rust on the steel surface, remove the external contaminants such as oil. Then, the rust and sand are removed by sandblasting, and the rust removal level reaches the Sa2.5 level required by the design.
After the steel rust removal is approved, the first primer is applied before the surface returns to rust. After the rust removal is qualified, if the surface of the steel has returned to rust before the primer is applied, the rust must be removed again.
6.2 Paint Method
If there are many types of rod diameters, air spray and manual coating methods can be used for paint coating. For air spraying, a PQ-1 counter-nozzle spray gun is used. The working pressure is 0.28 ~ 0.35Mpa and the nozzle diameter is 2-3mm. It is suitable for the construction of small-area objects and can reduce the loss of paint. In order to ensure the quality of spraying, the system of air pressure, spray volume and spray width should be adjusted reasonably, as well as spraying distance, spraying angle, spraying speed, spraying overlap width, etc.
6.3 Coating confirmation
Check the paint model, name and color before construction to see if it conforms to the design requirements; at the same time, check whether the manufacturing date exceeds the storage period.
6.4 Storage and transportation of paint and auxiliary materials
Coatings and solvents are generally chemically flammable and dangerous goods, and deterioration will occur when stored for too long; If storage conditions are not appropriate, they are easy to explode and burn. Therefore, coatings and auxiliary materials should be stored in a well-ventilated, dry warehouse, which is far away from direct sunlight and fire sources, and not allowed to be stored in the open.
6.5 Bucket Opening of Paint
After confirming the coating, remove the dust or dirt on the lid of the bucket before opening the bucket to prevent it from falling into the bucket when the bucket is opened. After opening the bucket, check the state of the original paint in the bucket. There should be no crusting, agglomeration, and gelation,etc. It should be able to stir up if there is precipitation, and remove it with a mesh sieve if there is patent leather. If agglomeration, gels, and precipitates cannot be stirred, the original paint has deteriorated.
6.6 Adjust the construction Viscosity
Before construction, viscosity must be adjusted, the so-called construction viscosity, to meet the requirements of construction methods and environmental changes. Use special thinner when adjusting paint viscosity.
6.7 Painting interval
The painting interval has a great impact on the quality of the coating. Proper control of the interval can enhance the adhesion between the coatings and the comprehensive protective performance of the coatings, otherwise it may cause "bottom biting" or large-area peeling and rust back phenomena,etc. Therefore, the next coating of this project should be sprayed after the last drying and curing.
6.8 Friction surface protection
No paint shall be applied within 100 mm of both sides of the weld. Large areas are covered with stickers and taped; small areas are all covered with tape.
6.9 Repair and repaint
After the coating finished, the self-inspection or inspector should find whether the coating is defective before installation. If any defects, the cause should be found out and repaired in time; the repair methods and requirements should be the same as the intact coating part. After the installation of the entire project is completed, the exposed parts of the joints, fasteners, welded and burnt parts during installation should be repainted.
6.10 Quality inspection and acceptance
During the coating process, each paint film must not have defects such as undercutting, peeling,coating missing, delamination and blistering. After the paint film dries, measure the dry film thickness with a paint film thickness meter. The total average thickness of the coating test should reach 90% of the design specified thickness to be qualified. When calculating the average value, the measurement points exceeding 20% of the specified thickness are calculated as 120% of the specified thickness.
7. Acceptance of steel components
After the steel structure stair components are manufactured, they shall be inspected and accepted in accordance with the provisions of construction drawings, specifications and BS standards. The allowable deviation of the component shape dimensions shall meet the requirements in the above regulations.
8. Packaging and shipping
8.1 The packaging shall be carried out after the coating is dried. The packaging shall protect the coating of the components from damage, and ensure that the components and parts are not deformed, damaged or lost.
8.2 Large components must be shipped in single pieces. Parts and components should be packed separately in bales, each bale weighing less than 5 tons. The components should be supported by a flexible packaging material to prevent the components from rubbing against each other and damaging the paint.
8.3 The connecting parts should be bundled and packed separately for shipment. When loading and unloading, use a soft rope such as nylon tape. It is forbidden to use kicking, picking, bumping and other working methods for loading and unloading and transfer to prevent damage to the paint due to friction.
8.4 Small items should be packed in boxes or neatly bundled with each other, and the bundle number should be listed on the label. The name of the component in each bundle shall be indicated on the shipping list.
8.5 Finished products should be shipped with a shipping list. The shipping list should include the zone number, component name, shape dimensions, and weight.